
Phalaenopsis orchids are a favorite among plant enthusiasts with their delicate and elegant blooms. These exotic beauties can add a touch of sophistication to any space, but they require specific care to thrive. If you find yourself with a sick orchid, don’t despair. With the proper techniques and patience, you can bring your plant back to life and enjoy its stunning flowers again.
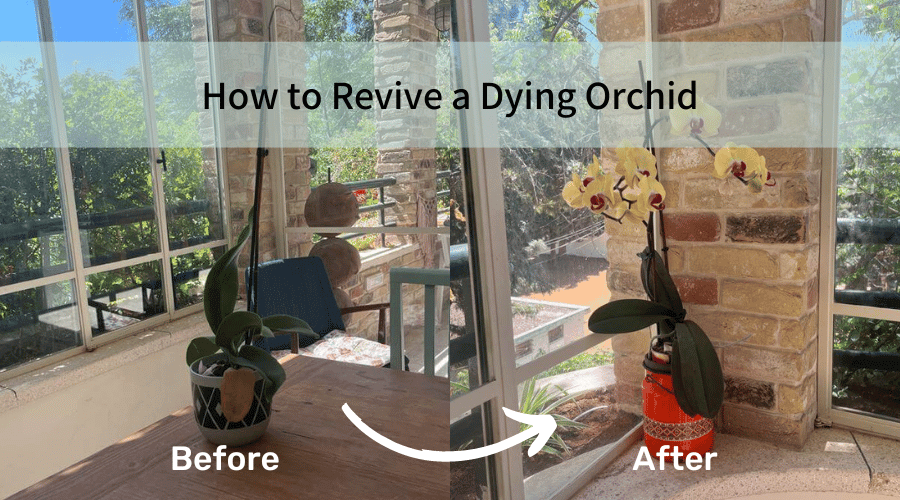
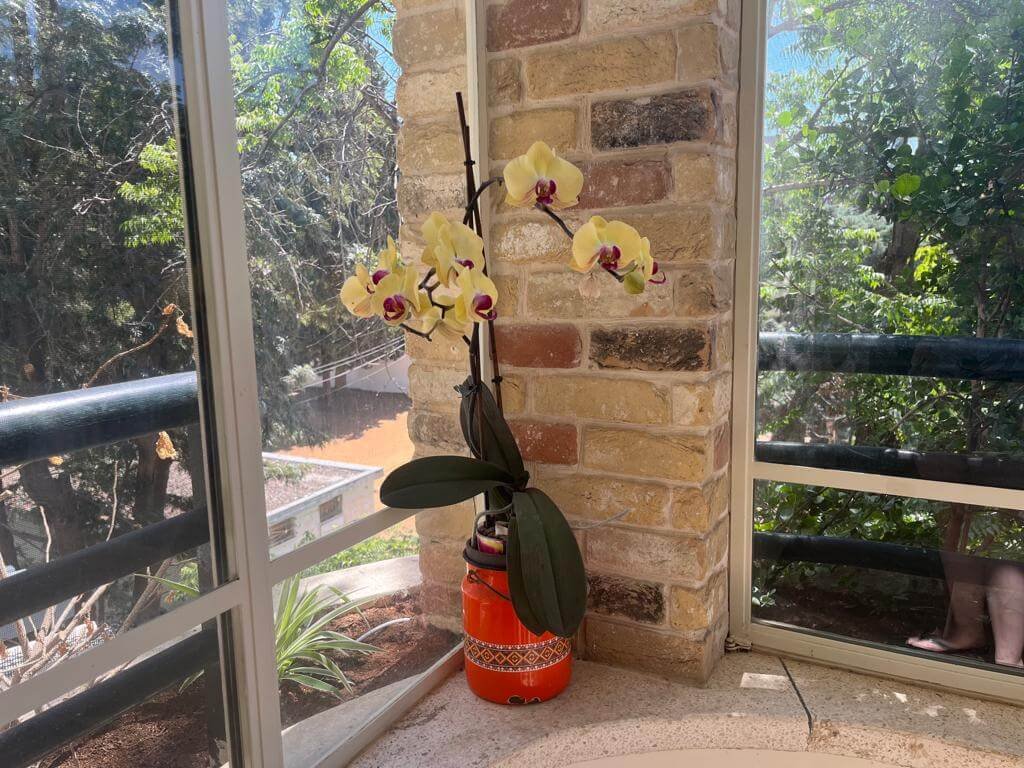
This article was written from my personal experience. A year ago my friend brought me a sick orchid. The orchid had a yellow leaf and a brown branch with no flowers. Notice how the orchid was in a container with no drainage at all. At the end of the article, I will share a photo of the same orchid exactly one year later.


Detecting and Treating Root Rot: Saving Your Orchid from the Silent Killer
Root rot is one of the most common problems that orchid owners face. It occurs when the plant’s roots become waterlogged, leading to the growth of harmful fungi and the decay of the root system. One of the primary causes of root rot is overwatering, so it’s essential to strike a balance when watering your orchid.
To determine if your orchid is suffering from root rot, gently remove it from its pot and examine the roots. Healthy orchid roots should be firm, plump, and light-colored. If you notice any dark, mushy, or foul-smelling roots, the rot will likely affect them.
To treat root rot, you’ll need to take immediate action. Start by carefully removing the orchid from its pot and gently rinsing the roots under running water to remove any remaining potting mix. Next, trim the dead and decaying roots using sterilized scissors or pruning shears. Make clean cuts, removing only the affected parts and leaving behind healthy tissue.
After pruning, allow the roots to dry for a few hours before repotting the orchid. This step is crucial to prevent the spread of any remaining fungal infection. Once the roots have dried, prepare a new pot with fresh orchid potting mix or sphagnum moss, which provides excellent drainage. Place the orchid in the pot, ensuring the remaining healthy roots are spread out evenly. Gently fill the pot with the potting mix, ensuring it is firmly in place and the roots are adequately covered.
Creating a New Home: Potting and Repotting Your Precious Phalaenopsis Orchid
Repotting your orchid is an essential step in its revival process. As orchids grow, they may outgrow their current pot or become root-bound, requiring more space to thrive. Repotting allows for better airflow, prevents the accumulation of salts and minerals, and provides fresh nutrients to support your orchid’s growth.
When selecting new orchid pots, choose one slightly larger than its current pot. It is better to use a clear plastic pot to see the roots’ state at any moment. Orchids prefer to be slightly snug in their containers, which helps stabilize the plant. Additionally, ensure the pot has adequate drainage holes to prevent water from pooling at the roots.
Before repotting, soak the new pot in water for about an hour. This helps prevent the potting mix from wicking away moisture from the roots too quickly. After soaking, fill the bottom of the pot with a layer of fresh orchid potting mix or damp sphagnum moss. This layer will help retain moisture while still providing excellent drainage.
It’s time to remove your orchid from its current pot gently. Carefully loosen the roots and untangle them, not damaging the healthy ones. Shake off any old potting mix, and if you encounter any dead or rotten roots, trim them away, as mentioned earlier.
Place the orchid in the new pot, evenly spreading the remaining healthy roots. Hold the orchid in place and add more potting mix or sphagnum moss around the roots, ensuring they are well-covered. Tap the pot gently to settle the mix and eliminate any air pockets.
Humidity and Light: Providing the Ideal Environment for Your Orchid’s Rejuvenation
Phalaenopsis orchids are native to humid environments, and replicating those conditions in your home is crucial for their well-being. Orchids thrive in environments with humidity levels ranging from 40% to 70%. While it may be challenging to maintain such high humidity indoors, you can employ a few tricks to provide the ideal conditions for your orchid.
One method is to place a tray filled with water near your orchid. As the water evaporates, it increases the humidity in the surrounding area. Ensure the pot is not sitting directly in the water, which can lead to root rot. Another option is to use a humidifier, especially in dry climates or in winter when indoor air is drier.
When it comes to lighting, orchids prefer bright light, indirect sunlight. Place your orchid near a window that receives filtered sunlight throughout the day. However, be cautious of direct sunlight, as it can scorch the delicate orchid leaves of the orchid. If you notice שמט yellow leaves or develop brown spots, it may indicate that the orchid is receiving too much direct light.
Watering and Fertilizing: Nourishing Your Orchid for Optimal Growth
Watering is essential to orchid care, and finding the right balance is critical. Orchids have unique water requirements, and overwatering can lead to root rot, while underwatering can cause the plant to become dehydrated. Understanding your orchid’s specific needs will help you provide it with the proper hydration.
Generally, water your orchid when the potting mix feels dry. Stick about an inch into the mix to check its moisture level. If it feels dry at this depth, it’s time to water your orchid. When watering, thoroughly drench the potting mix, allowing the water to flow through the pot’s drainage holes. This ensures that all the roots receive adequate hydration.
Avoid leaving your orchid in standing water, leading to root rot. Allow excess water to drain thoroughly before returning the orchid to its decorative pot or saucer. Remember, orchids prefer to dry out slightly between waterings, so it’s better to underwater than to overwater.
Water orchids with lukewarm water, not tap water, since tap water has a lot of scales that can kill them.
In addition to watering, fertilizing your orchid is essential for its growth and overall health. However, it’s important to note that orchids are light feeders and require a balanced approach when it comes to fertilization. Too much fertilizer can harm the plant, so finding the best way to provide the proper nutrients is crucial.
The next step in fertilizing your orchid is to choose a balanced orchid fertilizer and carefully follow the instructions on the package for the correct dosage. Typically, it’s recommended to fertilize your orchid once a month during the growing season, which spans spring to fall. During the dormant winter, you can reduce or even suspend fertilization as the plant’s nutrient requirements decrease.
To apply the fertilizer, ensure that the potting mix is already damp. This helps prevent the fertilizer from burning the delicate roots of the orchid. Dilute the fertilizer in water according to the package instructions, and then thoroughly soak the potting mix with the diluted solution. It’s essential to avoid getting fertilizer on the orchid leaves or flowers, as this can cause damage.
Remember, the goal of fertilizing your orchid is to provide it with the necessary nutrients in a balanced and controlled manner. Observing the plant’s response to the fertilizer and adjusting the dosage accordingly is vital to ensure optimal growth and health. Finding the right balance and following these guidelines can nourish your orchid and help it thrive.
The Journey Continues: Regenerating Orchid Flowers and Encouraging New Growth
Orchid flowers are a sight to behold, and the promise of their beautiful blooms is one of the reasons we adore these plants. If your orchid’s flowers have withered away, don’t lose hope. With proper care, your orchid can fully bloom and bring joy to your home.
After the flowers have faded, you can trim the flower spike just above a node. A node is a small bump or swelling along the spike where new growth can emerge. Cutting the spike above a node creates the potential for a new flower spike to develop. Sometimes, a new spike may grow from the same node, resulting in another round of gorgeous orchid blooms.
Be patient with your orchid, as the new spike may take some time to emerge. During this period, continue to provide the proper care and attention, ensuring that your orchid receives adequate light, humidity, and hydration. With time, you’ll be rewarded with a fresh flower spike and the anticipation of breathtaking blooms.
FAQ
Watering orchids with ice cubes has been a debated topic among enthusiasts. Advocates believe it provides controlled watering and reduces the risk of overwatering, while skeptics argue it may not adequately hydrate the roots and could potentially shock them. Orchids in their natural habitat do not receive water in ice cubes; traditional watering methods are generally recommended. Thoroughly watering the orchid and allowing for proper drainage while considering individual environmental factors are crucial for their health and growth. Stick to established watering practices to ensure your orchid receives the correct hydration and nutrients.
Determining whether an orchid is showing signs of recovery requires careful observation of the whole plant’s overall health and any changes in its growth patterns. Here are some indicators that your orchid may be on the path to recovery and full bloom:
New Growth: Look for the emergence of new leaves, roots, or flower spikes. These are positive signs that the whole plant is growing and recovering from its previous state. Keep an eye out for vibrant green tips indicating healthy growth.
Healthy Foliage: Assess the condition of the leaves. If they appear vibrant, firm, and free from discoloration or spots, it is a good sign that the plant is receiving adequate care and responding positively. Healthy plants have lush, green foliage.
Root Development: Check the roots for signs of growth and health. Healthy roots should be plump, firm, and light green or white. New root growth indicates that the orchid is recovering and establishing a solid foundation.
Increased Vigor: If the orchid appears more robust, with stronger stems and an overall improved plant structure, it responds well to the care provided and regains strength. A healthy orchid exhibits a sturdy and upright appearance.
Blooming: The ultimate sign of recovery for an orchid is the emergence of new flower spikes and, eventually, full bloom. If your orchid begins to produce flower spikes and blooms, it is excellent news and a clear indication that it is thriving and recovering successfully. Visiting vibrant and colorful flowers is a testament to the plant’s health and vitality.
Conclusion: Celebrating the Success of Orchid Revival and Your Green Thumb Triumph
Congratulations, my fellow plant aficionado! You’ve embarked on a mission to revive your dying orchid, armed with knowledge, love, and determination. By detecting and treating root rot, repotting your orchid, providing optimal humidity and enough light, and mastering the art of watering and fertilizing, you have set the stage for your orchid’s revival.
Remember, plants are resilient beings, and orchids are no exception. You can bring your phalaenopsis orchid back to life with dedication, patience, and a sprinkle of green magic. Soon enough, you’ll witness the vibrant blooms and flourishing foliage that once adorned your plant.
Celebrate your success as a plant parent and revel in the beauty and joy that your revived orchid brings to your home. Your green thumb triumph is a testament to the love and care you’ve invested in your plant. So keep growing, nurturing, and creating a thriving haven of greenery and happiness in your home.
Happy reviving, and may your orchid thrive and bloom for years!
Recent Posts
Unlocking the secret to expanding your begonia maculata family is like discovering a treasure trove of green goodness. If you've ever marveled at the stunning beauty of angel wing begonia leaves and...
If you've ever found yourself marveling at the surreal beauty of air plant blooms, you're in for a treat! These enchanting bursts of color amidst a sea of lush green foliage are like nature's way of...
